Lethabo Moroka
10 months
How To: Delete a Chatbot on KaraboAI
Sometimes, it’s time to say goodbye to a chatbot that you no longer need. Deleting a chatbot on KaraboAI is straightforward, but it's important to proceed with caution because this action is irreversible. Here’s a step-by-step guide to safely remove a chatbot from your KaraboAI dashboard:
Step 1: Navigate to Your Chatbot List
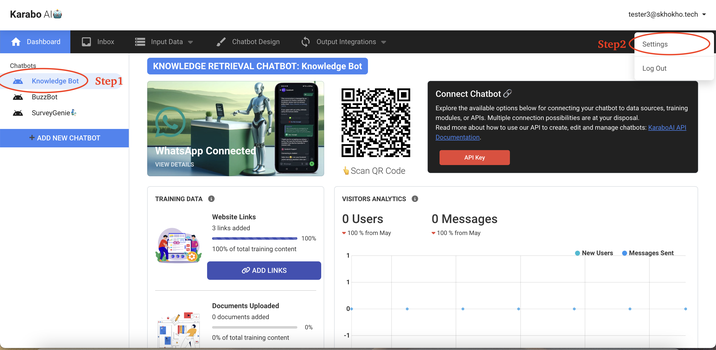
First, log in to your KaraboAI dashboard where all your chatbots are listed. You can find the list in the menu. Browse through it and click on the chatbot you wish to delete.
Step 2: Access Settings
After selecting the chatbot, click on your email address located at the top left of the screen. A dropdown menu will appear. From this menu, select 'Settings' to proceed with the deletion process.

Step 3: Delete Your Chatbot
In the Settings menu, you will see several options, including 'Manage Subscription,' 'Edit Chatbot Details,' and 'Delete Chatbot.' Click on the 'Delete' button next to 'Delete Chatbot.'
Step 4: Confirm the Deletion
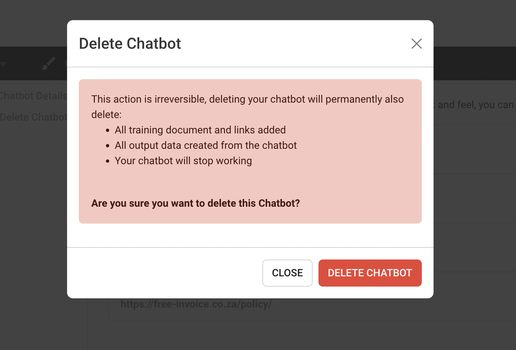
Before you finalize the deletion, a confirmation prompt will appear. This is your last chance to ensure that you really want to delete your chatbot. Remember, once deleted, this action cannot be undone, so make sure you have downloaded or saved any important data from the chatbot.

Final Step: Chatbot Deletion
After confirming your decision, the chatbot will be permanently deleted from your dashboard. And just like that—boom, your chatbot is gone!
Important Reminder:
Always make sure to back up any important data before deleting your chatbot, as this action is irreversible. By following these steps, you can ensure a smooth and error-free deletion process.

